Whether you are tackling a major home renovation, clearing out a landscape, or managing the aftermath of a storm, the success and efficiency of your cleanup hinge on one critical decision: choosing the right debris removal container. Often called dumpsters or roll-off containers, these units are far more than just metal boxes. They are a logistical cornerstone, dictating the pace of your project, your budget, and even your safety on site. Selecting the wrong size or type can lead to frustrating delays, unexpected overage fees, and a worksite that feels more chaotic than productive. Understanding the nuances of debris containers allows you to streamline waste management from the start, transforming a cumbersome chore into a well-orchestrated part of your project plan.
Understanding the Key Types of Debris Removal Containers
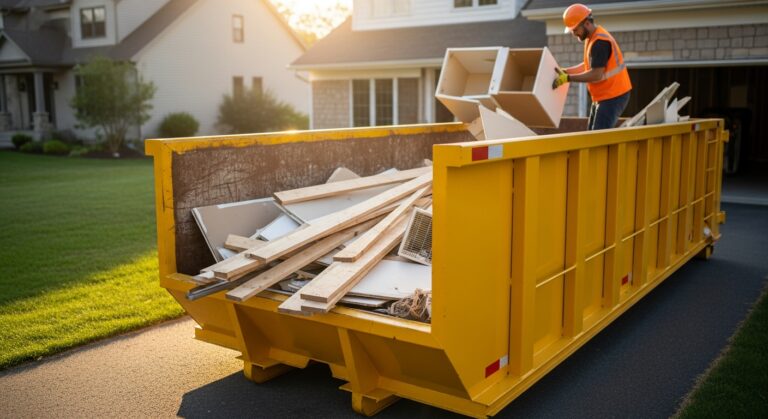
Not all debris containers are created equal. The most common type for residential and large-scale projects is the roll-off dumpster, characterized by its rectangular shape and wheels on one end for easy delivery and placement by a specialized truck. These are ideal for construction debris, major cleanouts, and roofing projects. For smaller, ongoing needs, like at a business or apartment complex, front-load dumpsters are the standard. These are serviced by trucks with mechanical arms that lift and empty the container without the driver leaving the cab. For projects involving heavy, dense materials like dirt, concrete, or bricks, specialized heavy-debris containers are often required. These are built with reinforced walls and sometimes a door for easier manual loading of heavy items. Recognizing which type aligns with your waste stream is the first step toward an efficient removal process.
Selecting the Perfect Container Size
Size selection is arguably the most common point of confusion and miscalculation. Renting a container that is too small leads to overfilling, which is a safety hazard and often prohibited by rental companies, resulting in refusal to pick up or costly overage charges. Conversely, a container that is too large wastes money and occupies unnecessary space on your property. Sizes are typically measured in cubic yards, which refers to the volume of debris the container can hold. To make an informed choice, you must estimate both the volume and weight of your debris. A kitchen remodel generates a different debris profile than a tree removal project. When in doubt, it is always wiser to consult with your rental provider. A reputable company will ask detailed questions about your project to recommend the most appropriate size. For reference, here is a general guide to common roll-off container sizes and their typical uses.
- 10-Yard Container: Perfect for small bathroom remodels, garage cleanouts, or small landscaping jobs. Holds roughly 3-4 pickup truck loads.
- 20-Yard Container: The most popular size for mid-size projects like roof replacements (for a standard home), full room renovations, or major yard waste removal. Holds about 6 truckloads.
- 30-Yard Container: Ideal for large home addition projects, whole-house cleanouts, or significant construction debris. Holds approximately 9 truckloads.
- 40-Yard Container: Used for major construction, commercial projects, or entire home demolition. This is the largest standard container, holding around 12 truckloads.
Navigating Rental Agreements and Prohibited Materials
Before committing to a rental, a thorough understanding of the terms and conditions is non-negotiable. The rental period, typically ranging from 7 to 14 days, should align with your project timeline. Be clear on the pickup and delivery process, including any site requirements like a hard, flat surface and necessary permits if the container will be placed on a public street. Crucially, you must understand the weight limits. Your fee usually includes a set weight allowance (tonnage); exceeding it incurs overage charges per ton. This is especially important for heavy materials like dirt, shingles, or concrete. Furthermore, all rental companies have a strict list of prohibited items that cannot be placed in standard debris removal containers. These items require special handling due to environmental and safety regulations. Common prohibited materials include hazardous chemicals, paints, solvents, batteries, tires, appliances containing Freon (like air conditioners and refrigerators unless properly evacuated), and medical waste. Always disclose your project details to the rental company to avoid violations and additional fees.
Strategic Placement and Safe Loading Practices
Where you place your container has significant implications for safety, convenience, and potential damage. Choose a location that is easily accessible for the delivery truck, with ample overhead clearance from trees and wires, and on a solid surface like a driveway or compacted ground. Avoid soft lawns, which can be severely damaged by the weight. Once placed, loading the container safely and efficiently is key. The goal is to distribute weight evenly and maximize space. Start by placing flat, heavy items like plywood or broken concrete at the bottom to create a stable base. Then, layer lighter, bulkier items on top. Break down large items whenever possible to eliminate empty air pockets. Never overfill the container above the top of its walls; this is unsafe for transport and illegal on public roads. Keep the load level to prevent shifting during transit.
Maximizing Value and Ensuring a Smooth Process
To get the best value from your debris container rental, a little planning goes a long way. First, obtain quotes from multiple reputable providers, ensuring you are comparing identical service levels, container sizes, rental periods, and weight allowances. Be upfront about the exact nature of your debris. Consolidate your project work to fit within the rental period to avoid extension fees. If you are generating multiple types of waste, consider separating recyclable materials like metals, clean wood, or concrete, as some companies offer reduced rates for recycling or separate containers for these streams, which can lower your overall disposal costs. Finally, maintain clear communication with your provider. Inform them of any issues or delays, and schedule the pickup promptly once the container is full. A proactive approach ensures the container is an asset, not a liability, keeping your project site clean, safe, and on schedule.
By investing time in selecting the correct debris removal container and understanding the rental process, you empower your project with a foundation of efficiency. The right container becomes a seamless extension of your workflow, containing the mess and allowing progress to continue unimpeded. It is a tool that, when chosen wisely, safeguards your budget, protects your property, and ultimately contributes to the successful and timely completion of your clean-up or construction goals.